End */
Showing posts with label homemakerdiy. Show all posts

Tuesday, June 21, 2016

Step 3: New Beams, Insulation, and Sub-Flooring


This is our last major construction day and boy are we excited. We worked late into the night, but we finished up all the prep you saw in step 2,  replaced the rotted support beams, laid the insulation, and then put in the new flooring. There isn't too much I can personally instruct you in here, more like just show you the outcome of our work.

The beams were a pain. If we had a chance to lay the entire floor by scratch the beams could be laid out in a nice even pattern, but for a partial fix we had to make up some of our own rules. To do that we purchased straight braces and L-braces to best secure the 2x2's. L-brackets were used to secure the new beams to the outer 2x2 frame like this:

And the straight brackets were used to brace together new beams to the solid old beams we found:


Laying the insulation is fairly easy. We purchased this kind: http://www.homedepot.com/p/Owens-Corning-R-19-Kraft-Faced-Insulation-Continuous-Roll-15-in-x-39-2-ft-RF40/202585898 

Owens Corning R-19 Kraft Faced Insulation Continuous Roll 15 in. x 39.2 ft.
It was a good compromise between price and level of insulation. The roll appears thin but expands to the perfect thickness for our floor when it's unrolled. The width of course is too wide but you can just use scissors to cut the insulation to size. Make sure you wear gloves to to protect yourself from the fiberglass pieces, you want to avoid the itch they cause, trust me. Plenty of insulation is better than too little insulation, just remember that, and stuff your floorboards. 

Finally, we laid the new subfloor. You can use either a 1/2" or 3/4" OSB plywood depending on the width of your previous floor. We cut it to fit the sections we had removed, so there's about an inch of old flooring around the cabinets that will butt up to the new flooring. Check out the overall finished product below.

Pictures:

New Beams                               Sub-Floor


New Beams                               Insulation                               Sub-Floor


New Beams                               Insulation                                         Sub-Floor


New Beams                                  Insulation                                      Sub-Floor


New Beams                                       Insulation                                       Sub-Floor


You may also notice that the walls look dingy; it is because they've been sanded to prep them for paint. Sanding doesn't have to go very deep, the surface just needs to be roughed up so the paint will stick. You can see that I've sanded the walls in the pictures with the sub-floor and I've also sanded the bathroom, shown below.

Next we'll cover the painting of the camper in step 4. 


Monday, June 20, 2016

Step 2: Tearing out the Sub Floor!!!!

This is the most demolition we get to do. And it was grueling. The flooring that was put in here had already been repaired once and that led to a combination of adhesive, nails, staples, and screws holding the plywood down. To battle something like this you're going to need quite a few tools, because this was a monster.

Tools:


  • one small crowbar
  • one MASSIVE crowbar
  • cordless tool set, this is the best deal I found for buying many tools at once on a budget
    • we chose Ryobi because they are inexpensive, they have a wide variety of battery powered tools, and the batteries are interchangeable between all the tools in this line.
    • the drawbacks: the battery life isn't that long, the drill bits wear out readily, and if you have access to a higher grade of tools, or just feel like spending about $800 dollars, go for a better brand, as it is we spent just under $300 for everything we need. 
    • http://www.homedepot.com/p/Ryobi-ONE-18-Volt-Lithium-Ion-Cordless-Super-Combo-Kit-4-Piece-P883/203466914Ryobi ONE+ 18-Volt Lithium-Ion Cordless Super Combo Kit (4-Piece)
    • We needed all of these things to get the floor out (excepting the flashlight). 
      • Cordless drill
      • cordless circular saw
      • cordless saws-all
      • cordless battery charger
    • You will also need a drill bit set and extra batters, get at least two. If you're feeling adventurous, their 6 battery charger would also be super useful. 
Now that you've got your stuff, the basic principal of tearing up sub-floor is: get it up in any way you can without damaging its supports or in this case the metal bottom of the camper. In all the places the sub-floor was screwed down it was best to remove the screws first rather than try to pry it up. Finally, you'll see in the photos that we cut a straight edge around the walls and cabinets or benches that we didn't remove. It was our thinking that those pieces would stay better supported that way. So without further ado:

My wonderful hubby (who puts up with and helps out on all my crazy "adventures") breaking ground on our demo!!!

Tips and Tricks for Demo and Floor Prep:

  • Pry up everything possible with the crow bars, and don't be afraid to bring the saws into it. Having the pieces cut down into smaller sections makes them considerably easier to pull out in the small spaces and weird angles of the camper.
  • Making nice clean corners is best done with a small handheld saw, we picked one up for a few dollars at walmart, but any home improvement store will have saw choices as well. It's hard to see in the picture below (sorry we were working in the dark), but my husband is wearing gloves for hand protection and sawing out a corner.
  • Once you've cleaned up all the edges, remove the screws for a smooth final surface to lay your new subfloor on. 

  • Then use a crow bar to remove all the nails
  • Rather than removing the staples, we found it was easiest to just use a hammer to flatten them into the beams (since they were old and rusty and prone to snapping off when we tried to remove them anyway).


Pictures:

Before                                           After


Before                               After


Before                                  After


After: Left Bench Area


After: Right Bench Area

This is where the worst of the water damage was, we believe it is due to a poorly sealed storage door on the outside of the camper. 


Repairing the Bottom Metal Sheeting:

This is the barrier between the outside and the inside of the camper. It lays on top of the trailer frame and is AMAZINGLY delicate. We punched a few holes in it ourselves and also found a few holes due to rust. Luckily there is a cheap way to fix the damage with a metal tape used to repair duct systems.

Tape:

Intertape Polymer Group 2 in. x 50 yds. Medium Grade Cold Temperature Aluminum Foil Tape
Behold the damage:


1.  Find a hole

2. Start taping in one direction

3.Place perpendicular tape strips


4. Third layer of tape in the original direction


5. In all possible cases repair holes from inside and outside the camper


 Annnnnnnnnnnnd now we're done. We are ready to put in insulation and the new sub-floor. That will all be covered in step 3.


Step 1: Removing Hardware and Built-Ins


So now that we have a camper, we know where it is damaged (and we know where it is ugly), what do we do to fix that? Well it's time for a renovation, of course! And that means demolition is in our future. 

However, before we can just start ripping things out, we have a lot that needs to be carefully removed, thrown away or painted externally to the camper, and carefully re-installed when it's finished. 

The first order of business (which I don't have pictures of, sorry!) was removing the ugly fabric. Let me give you a short step by step to help with this process. (At this point you've probably realized there are a lot of cushions in your way. Just take them inside and deposit them in a low traffic area, you're not going to need them for a couple of weeks.) 

1. Remove the valance like objects first. These are fabric pieces stapled to the wood extrusions that hold up the curtains. In order to not damage the wood veneer of the walls or the wood pieces themselves, you'll want a pair of needle-nose pliers to help pull out the staples. Protip: wear some gloves if you're smart. I am not smart and the pliers' rubber grip rubbed a raw spot on my palm, AND I got stabbed by a staple. 
2. Once you've gotten the valances off, you need to remove the curtains. In our camper, a small square headed screw prevented the curtains from sliding out of the end of their tracks. I removed the screws and slid the curtains out and straight into a garbage bag. I wouldn't bother saving the provided curtain hardware because later I'm going to show you a MUCH better method. 
3. Remove the tracks the curtains were in. This isn't really fabric removal, but you might as well do it now. Our tracks were made of a plastic material, if yours are a thin metal the same process will work. Ours were stapled in. If yours were nailed in you can use this method, but if you have screws you will need to go fetch your drill. Basically, the best way to remove these is to just pry them out. If you're my husband, that means with your fingertips. However, if you're me, you'll want a method a bit less strenuous. I recommend a small crowbar (but even a metal ruler will help. A flathead screwdriver is another option.) Just start at one end and carefully pry them away. In order to preserve the wood pieces (which is important because these wood pieces serve as supports for the bunk beds above), you need to pry more and pull less. Go a couple inches at a time instead of trying to quickly rip the whole thing out at once! 
4. Now you're mostly done. Yay us!! Look around for any miscellaneous fabricked surfaces. In my case, the front of the sofa bed and the top of the camper doorway had a shin and head guard, respectively, made of fabric. The sofa bed piece was actually attached with screws, and we unscrewed them and then just threw the whole piece away, interior wood piece, fabric, screws, and all. The head piece in the door way is still there. One: because I forgot it. Two: because it's helping my husband not hit his head while we renovate, so I'll wait and replace it later, once I have fabric picked out. 


Now, we have removed all the fabric bits, o it's time for everything else. The general rule of thumb here is to remove anything that can be easily detached and reattached later. Right now I just want to get it out of the camper where it will be less likely to be harmed when we rip up the floor. That also means we don't need to bother taking off handles and nonsense from the removed cabinet doors just yet, we'll do that later. For now, we just need to remove the hinges from the cabinets and walls and take the entire doors, including hinges, inside to store for bit. 

There is no real step by step for this. Instead just unscrew everything and get it out of there. Below you can see what ours looks like once we've taken everything out of it. We also went ahead and pulled up the old linoleum. That was easy as much of it was water damaged and you could easily rip it off the floor. We trimmed it around the cabinets and walls using a knife for a clean edge. 


PICTURES:


Here we have the view from the door of the sofa that turns into bed number 2. In this picture we have the linoleum ripped up so you can see the subfloor and some water stains indicating water damage and potential rot.

Before                                              After


Here's a view of the sofa from the far end of the camper, you can see the light coming in the door to the right. All the cabinets have been removed but I took this picture before we ripped up the linoleum. 

Before                                  After 


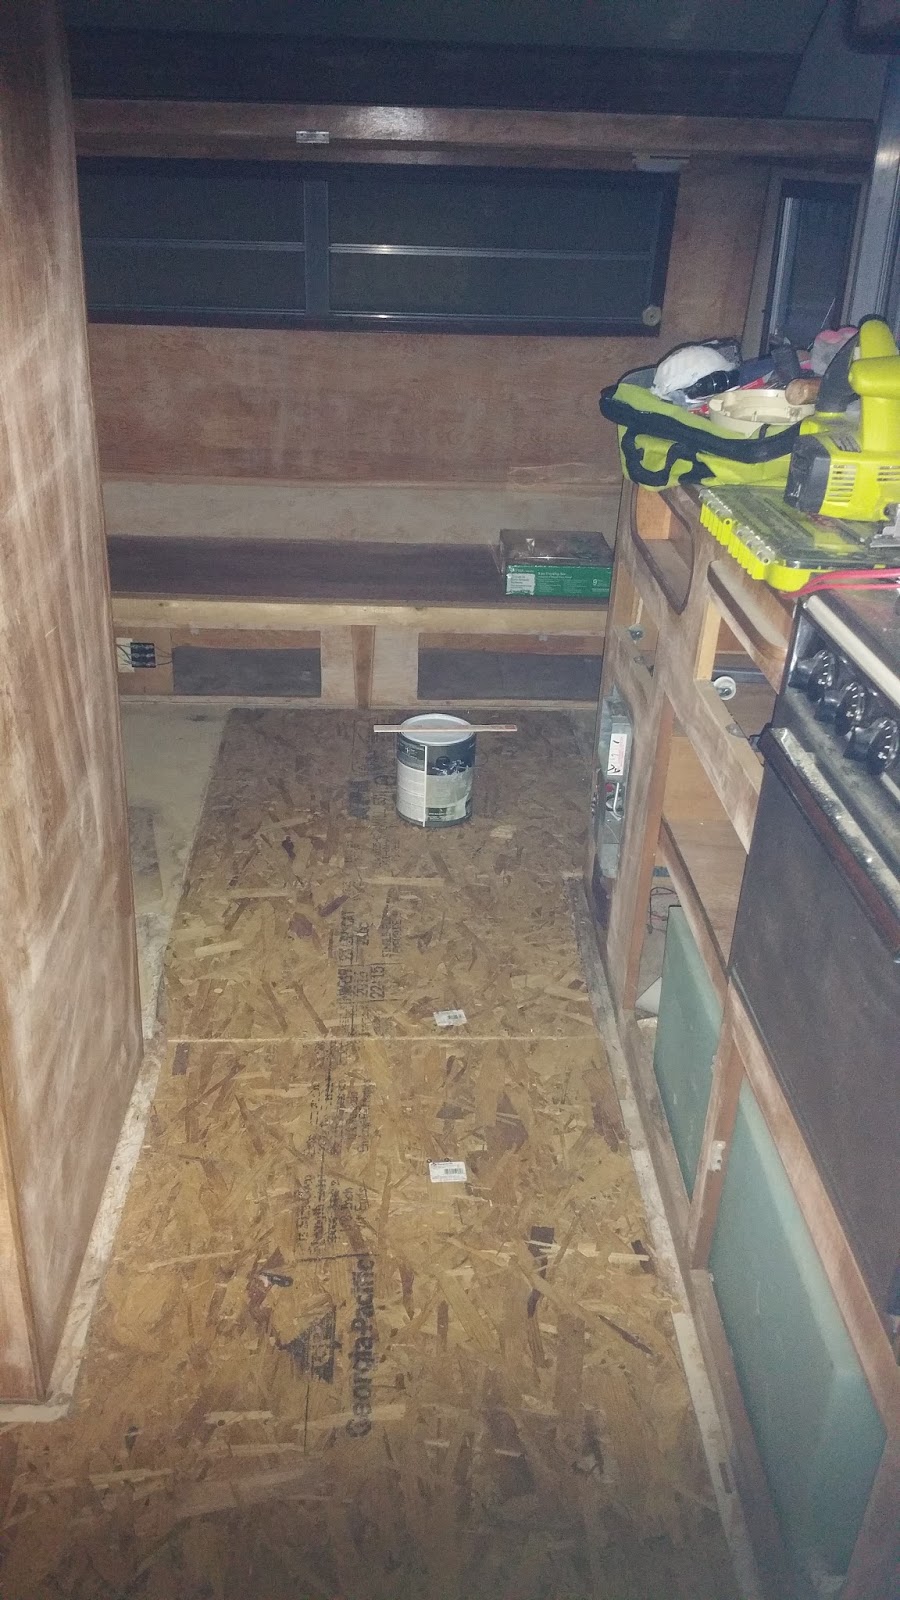
Next we've got the kitchen, cabinets have been removed, linoleum is still down. Check out that hideous wallpaper!! I can't wait to paint over it.

Before                               After


 The next four pictures are the bathroom area. First we had to take the whole door off, then inside the bathroom the cabinets and movable fixtures were removed. We ended up removing the threshold pieces from the bathroom door and the middle of the kitchen floor. However, we don't plan to tear up the floor in the bathroom since it is structurally sound. For now we're leaving the linoleum down until we get new tile or tile linoleum.

Before

After


 Cabinets were easy to remove. These built in benches were a little more difficult. As you can see everyone pitched in a hand, or paw, to help. The benches were screwed in from the outside wall and the screw heads were underneath the outer paneling. We removed the visible screws, then pulled the boards off of the outer wall screws. Finally we cut the protruding screw heads from the wall with a bolt cutter. Yay for making up procedures!


Finally got those out! You can also see a metal box on the floor. We unwired it before removing the subfloor. It's a converter for the electrical system, and we marked each wire with masking tape to match the diagram provided on the converter itself, that way we can easily rewire it later.


Final before and after showing the kitchen and the dining area/main bed.

Before                                   After


Now, all we have to do is start demo on the floor!