End */
Showing posts with label homemade. Show all posts

Tuesday, April 7, 2015

Simple Living Hairspray

   
I love the hold on this product.

If the statement above is true, then this hairspray makes me wonderwoman.

How much more simple can you get than three ingredients for a great holding hairspray. Best of all it costs less than a dollar to make!

Ingredients:
-3/4 cups boiled water
-1 tbsp white sugar (or raw sugar)
-1/2 tbsp vodka or white rum (I prefer vodka to avoid the rume scent)
-you can add about 7 drops of essential oil for a scent, but I never do

Directions:

1. Boil your water in a saucepan.
2. Once boiling add the sugar and stir to desolve.
3. Add the alcohol and give it time to heat up (boiling is not necessary) 
4. Allow it to cool before putting it in a spray bottle.

Any spray bottle will do. I use one of the TSA approved ones from the travel toiletries section in any supermarket, pharmacy store, Walmart, Target, etc. That way I can easily take it in my purse for hair emergencies whenever they strike. You can even use a larger all-purpose type spray bottle if you like.

Some tidbits of information. This hairspray does have an expiration date based on the fact that it has sugar in it. I find it takes a few months for it to spoil. But on the upside of things, this hairspray can be easily brushed out of your hair. Unlike store-bought sprays you don't have to wash your hair immediately after using. You can brush it out and go to bed after your night out on the town. The next day your hair will be fine and not at all stiff.


The Real Clean Detergent

                                   
Here's a recipe for you. You may not think about it, but your laundry detergent is in your life a lot more than you may think. And like a clingy ex-boyfriend, the toxins are lingering. Chemicals that you can't even pronounce are still in the fibers of your clothes where your skin is exposed to them all day, every day. If you're like me then you like to expose your skin to things you clearly understand like baking soda, and the coconut oil this soap is based in. 

Even better you use far less of this detergent per load. Therefore it's a good way to save money. Especially since it's cheaper by volume anyway (about half the cost of name brand detergent per gallon). 


Two things you should know about this laundry soap. 
1. It is very effective. I haven't mentioned this before but my husband serves on a naval submarine. If you are familiar with submarines then you know that the smell that permeates everything on that boat can be the bane of a laundry-woman's existence. It is next to impossible to get rid of. Yet the baking soda in this recipe gets rid of it better than anything I've ever used. Furthermore this recipe leaves a pleasant lavendar scent. 

2. I do use borax in this recipe. A lot of bloggers and natural health enthusiasts have expressed concern over the use of borax. However, since I have not been able to find any real evidence against borax, I choose to use it as my mother and my grandmother before me used it. If it makes you nervous leave it out of this recipe. Just know that the detergent will be less effective at removing stains, particularly sweat stains (the kind that love to appear in pits and around dress shirt collars). 

Here's the recipe:

-1/2 bar of scented coconut oil soap (grated) 
-2 cups of baking soda
-1 and 1/2 cups super washing soda
-1/2 cup and up to 1 cup of borax

Directions:

1. Grate half a bar of the soap into your container (I use a big ol' coffee tin)
2. (only if your soap is unscented for some reason) add 10 drops of essential oil (like lavendar) to the grated soap, mix, and let sit for 15 minutes or so.
3. Add in the baking soda, washing soda, and borax. 
4. Mix carefully, the baking soda tends to powder puff everywhere!
5. Use WAYYYYY less of it than you would store bought soap. About 2-3 tbsp of it. (More like 1/3 of a cup on submarine laundry).

If you like this recipe and you want to get even more homemade, I am currently working on soap recipes for a coconut oil based soap. I can't wait to share it with you! 

We Can Do It! Building a Table

I promised to give you projects that Rosie the Riveter would be proud of, and here is the first one. 
                                    

So for one of my first major projects in my new home I decided to build a table. I built it out of real wood and spent about $25 dollars to do so. It's just a small round side table that I use between my two big leather chairs. However even smaller tables made out of particle board were $50 or more in retail stores, and I didn't even like any of them. So I set off to beat the retail stores and purchased what I needed to make a table of my own. 

What you need:
-A Phillips head screwdriver (that fits your chosen screws well)
-Wood screws (at least 1/2 inch longer than your table top is thick)
-Wood Putty
-A table top (mine is a 27 inch diameter and an inch and a half thick, purchased at Lowes)
-2 rods (4 feet in length by one and half inches thick, purchased at A.C.Moore)
-One saw
-Sandpaper
-optional* small pieces of wood to use as supports between the legs----if you do this you will need wood glue and clamps.

This is really more straight-forward than you might imagine. You can do it!

Directions:

1. Mark on your table where each of the legs will go. This is mostly up to you because of aesthetic reasons. I aimed to have them about three inches from the edge. Make sure to space them evenly or your table wobble.

2. You also need to measure out two feet (to the middle) of your two rods. If you are lucky enough to have a power saw then use that to cut evenly throught the rod. If not I suggest marking the 2 foot line all the way around the rod before trying to cut straight with a hand saw. Set them aside

3. Where you marked the table for the four legs use the screwdriver to power the screws through to the bottom side. 

4. Once you've done all four, get the rod halves. Use the screw driver to hold the screw in place while screwing the rods onto the table.

5. Set your table up on its legs to test that it is even. If it is not adjust the rods by tightening the longest ones on their screws.

6. Apply wood putty over the screws (carefully). 

7. Allow it to dry for the amount of time prescribed on the bottle. Then sand it down to be smooth.
                                     

There's your table!!

If you decided to add the leg supports you need to cut them to the appropriate length (measure the distance between the legs). Bear in mind that these may not be the exact same length. Use the same marking and sawing method you used for the rod legs to cut them. Then set your table on its top. Use wood glue to position the supports and clamp them into place. I used only two and I attached them after I stained the piece so you will see them in later pictures. Using four would be a good idea for stability's sake.

After I finished the table building, I painted a design on the top. 
                             
I used acrylic paints that I already had from other previous projects.

Then finally I stained the piece in a color called Gun Stock by Minwax. I love this classic color for a very vintage look. It took two coat and I stained right over the acrylic paint except for the white parts. Finally I used a polyurethane to finish it off and give it a shined up finish!

Finished Product:
                                   

Stay tuned for more cost savvy DIY Decor projects! 


DIY Crochet Bedspread

Here's a quick post I wanted to share with you guys! 

I made this bedspread for my guest room. I found it on another blog called Da's Crochet Connection and I loved it so much I wanted to share it with you all. It's a great project for scrap yarn. The original source is at the bottom of this post.

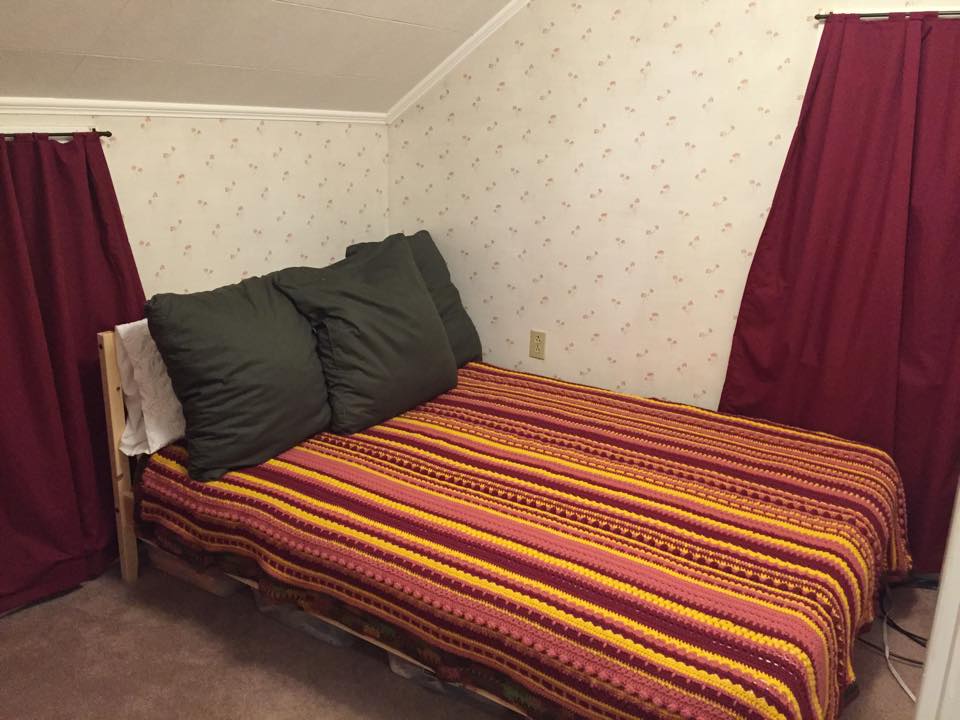
 (Look my guest room is almost pretty!)
(BTW later I'll show you how I made the curtains)

So here's the patter I followed:

"Finished size: 52 1⁄2 inches (133 cm) by 64 inches (162 cm)

Yarn: Stylecraft Special DK.
Colors: Aspen, Aster, Bluebell, Clematis, Cloud Blue, Fondant, Lavender, Lipstick, Magenta, Meadow, Pomegranate, Sherbet, Shrimp, Spring Green, Sunshine, Turquoise, and Wisteria.

Hook Size: G-6 (4mm) and a 7 (4.5 mm) the 7 or 4.5mm hook is only used for the dfpdc rows 29, 31, 37, and 39 and so forth

Stitches used:
Basic stitches: ch-chain , sc-single crochet, hdc-half double crochet, dc-double crochet, tr-treble/triple, sk-skip a stitch, yo-yarn over

Special Stitches:
Double Front Post Double Crochet (dfpdc)-Yo, insert hook from front to back around the next two double crochets, (Yo, draw through two loops on hook) Twice, See hook size for hook changes Popcorn stitch- make 5 dc in the stitch indicated, remove the hook and insert from the front to the back through the top of the first stitch and then in the dropped loop yo and pull through the 2 loops on the hook
Puff stitch- *yo, insert hook into stitch indicated and pull up a loop, * repeat from * to* four more times, yo and pull through all 9 loops on the hook, ch1
”V” stitch-dc, ch1, dc in the stitch indicated
Reverse single crochet (crab stitch)- insert hook in the next stitch to the right, yarn over and pull up a loop, yarn over and pull through the 2 loops on the hook.

Notes about pattern:
This pattern is written in U.S. terms

Blanket is done in multiples of 24, as to accommodate the stitch patterns that are done in multiples of 2,4,6, and 8. So for a blanket about 50 inches (127cm) without edging, I would chain 216 (9x24) or for a blanket about 56 inches (142 cm) without edging, I would chain 240 (10 x24) and so forth.
Because of all the different stitches used, there will probably be a small amount of adjusting, depending on which pattern is used. So make sure to check that you have the beginning stitch count after each row.
Color changes are not listed in the pattern, as to leave the color creativity to you.

Each group of stitches is done in sets so it makes it easier to end the blanket. Row 1 Foundation row
Rows 2-20= Set1
Rows 21-25=Transition rows, between sets
Rows= 26-41= Set 2

Blanket pattern:
Chain 242= 240 plus 2 for turning
Row 1: hdc in second chain from hook and in each chain across (240 sts), ch 2, turn
Row 2: hdc in each chain across (240 sts), ch 2, turn
Row 3: hdc in each stitch (st) across (240 sts), ch 1, turn
Row 4: sc in the next 3 sts, *dc over the next st into hdc from row 2, sc in next 3 sts, * repeat from * to * to the end, ch 2, turn
Row 5: hdc in each chain across (240 sts), ch 2, turn
Row 6: Repeat row 5 but ch 3, turn
Row 7: sk first st, * “V” sitich in the next st, sk next st*, repeat from * to * to the last 2 sts, skip next st and dc in the last st. ch 1, turn
Row 8: 2 sc in the first space, * 1 sc in ch 1 space, 1 sc between the “V” st, repeat form * to * until the last sp, 2 sc in the last space 1 sc in ch 2, ch 2, turn
Row 9: Hdc in each st across. Ch 1, turn
Row 10: sc in each st across, ch 1 turn
Row11: sc in the next 2 sts, popcorn in the next st, * sc in the next 3 sts, popcorn in the next st* repeat from * to * to the last 3 sts, sc in the last 3 sts, ch1, turn
Row 12: sc in each st across to the end, ch 1, turn
Row 13: Hdc in each st across to the end, ch 3, turn
Row 14: Repeat row 7
Row 15: Repeat row 8, ch 2, turn
Row 16: hdc in each st across to end, ch 2, turn
Row 17: hdc in each st across to end, ch 1, turn
Row 18: repeat row 4
Row 19: repeat row 5
Row 20: repeat row 6
Row 21: 1dc in the first st, *skip 2 sts, work 3 dc into next st (this is a 3 dc cluster),* repeat from * to * until the last 3 sts, sk 2 sts, 2 dc in the last st, ch 1 turn
Row 22: sc in the 1st st, ch 2 sc in the space between the clusters, * ch 3, sc in the sp between next clusters* repeat from * to * to the last space between clusters, ch 2, sc in the last st, ch 3 turn
Row 23: 2 dc in the ch 2 sp, 3 dc in each ch 3 sp across to the last ch 2 sp, 2 dc in ch 2 space, dc in last st, ch 1 turn
Row 24: Repeat row 22
Row 25; Repeat row 23, but ch 2 instead of ch1, turn
Row 26: Hdc in each st across, ch 2, turn (240 sts)
Row 27: Hdc in each st across, ch 3 turn (240 sts)
Row 28: dc in each st across, ch 3 turn (240 sts)
Row 29: *dfpdc around the next 2 dc, ch1; * repeat from * to * to the last st, dc in the last st ch 3 turn
Row 30: 2 dc in each of the ch 1 spaces across to the last st,dc in last st, ch 3 turn
Row 31: Repeat row 29, but ch 2 instead of ch 3
Row 32: hdc in each dfpdc and ch 1 space across, ch 3, turn
Row 33: Puff st in the next st, *skip next st, puff st in the next st * repeat from * to * to the last st, dc in the last st, ch 3 turn
Row 34: Puff st in the space between the next two puff sts across to the last st, dc in the last st, ch 2 turn
Row 35: hdc in each puff st and each sp between puff sts across, ch 3 turn (240sts)
Row 36: Repeat row 28
Row 37: Repeat row 29
Row 38: Repeat row 30
Row 39: Repeat row 31
Row 40: Repeat row 32
Row 41: Hdc in each st across (240 sts)
From this point on you will repeat the transition rows, set 1, transition rows, and set 2 until the blanket is the length you desire."

I did not include the border used originally, because I made up my own. Itwas just double crochets all around with increases in the stitches at the corners. I did four rounds of that to finish. Nothing compicated.

Here's Da's blog! Check her projects out!